Pages

Wednesday, July 29, 2015

Vacation in Chicago

Hi Everyone!
Today I have some photos I took while I was in Chicago in June.
My daughter lives in Chicago and I'm there twice a year.
I'm hoping next summer to stay longer.

All these pictures were shot with my Canon PowerShot SX710 HS.
I only sized them for my blog. No other changes.
I wanted to see what they looked like without doing a lot of editing.
It was many creative settings to use.
I haven't used them all.

It has a great zoom.
This is the ferris wheel at Navy Pier.
This is the middle of the wheel where it's all connected.
See the lights?


Here is another shot of the center of the wheel.


There were tons of Sea Gulls and I was trying to get them in my shot.


Stairs going up the the carnival area of Navy Pier


Here are a couple of the creative shots from the camera.


Too funny!


We were walking to get lunch and I looked down the street and you can see the fog coming in off the lake.


Buildings at night.


Didn't realize the moon was in this one until I downloaded it off the camera.


Walking along the lake.
I love trying to get shots of the water spraying up into the air.


I was taking a picture of the lake and some birds but these two ran in front of my camera.
I love the shot.
They both are carrying their cell phones in different hands.
Look closely.
Look at the hand they are holding the cell phone with and their legs.
Whichever hand they are using that leg is in the back.


I hope you enjoyed my pictures. 
Thanks so much for stopping by!


Monday, July 27, 2015

A Big White Blob: I just went with it.

Yes here is the blog.
It was supposed to be a fine like of white paint.
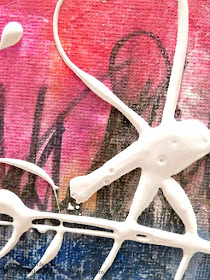
The tip of the bottle, which was old, broke off and this happened.


So I just went with it. I love it.

First, here is a list of the supplies I used.

  • 8x10 Canvas Panel. You can buy these at your local art or craft stores.
  • Gesso - Faber-Castell Design Memory Craft
  • PITT artist pens - cold grey and black
  • Gelatos - orange soda, bubble gum, red cherry, passion fruit, boysenberry, lime and margarita mix
  • Mini Circle Grid by The Crafter's Workshop - TCW203s
  • Rubber Stamp (sorry no idea who makes it)
  • 1 piece of deli paper
LINKS TO PRODUCTS:


 Here are the steps on how I created it.

Step One: I used a palette knife to add gesso to the canvas. I love using a palette knife because it gives the canvas texture.


Step Two: I added an alphabet stamp to the background with the cold grey PITT artist pen


Step Three: I love writing or scribbles in my pieces. I used a black PITT artist pen to add my writing. Yes, it does say something but that's between me and my canvas.
 

 Step Four:  I started at the top and added  orange soda, bubble gum, red cherry, passion fruit, sprayed it with water and used my finger to blend the colors.  I repeated the same technique with   boysenberry, lime and margarita mix for the bottom half.


Step Five: Once the top and bottom were all blended I sprayed it again with water and layered a piece of deli paper on the top. I do this to take off some of the color. I like it to look a little distressed in places. It's like monoprinting without the plate.


This is what the deli paper looked like.


Step Six: I then used the Mini Circle Grid stencil and a baby wipe and took off more color. I chose to only do it on the one side of the canvas. 


Step Seven: I wanted to add more white in the middle of the canvas where the colors meet.  I added gesso in a fine tip bottle with a little water BUT it was an old bottle and the tip broke and put a blob of paint on the canvas instead.  So I went with and just squirted out the rest of the paint which gave me the perfect finish to my painting.

Here is a picture of the blob of paint before I show you the finished canvas. Remember there are no mistakes in art. You just go with it and you will find it wasn't a mistake at all.


Here is the finished painting.


Although you can use gel medium on top to seal the Gelatos, I use Krylon Acrylic Sealer Spray. The  Gelatos are water colors and if you add more water or something wet they will run.  I found if I take my time and spray lightly they don't run.  This piece has four layers of the sealer.

I hope you find this an easy way for your to create something special for your home.

Thanks so much for stopping by!


Friday, July 24, 2015

Not sure I'm liking this but ....

I'm going to show it to you anyway.
I've this finished for over a year.
In an effort to clearing out my art room, I took all my paintings and brought them out to the living room.
This was supposed to be a gift.
I shared this on my Facebook page and Instagram and many people liked it.

It never ceases to amaze me that the pieces I don't like everyone loves.


The whole thing was created with The Crafter's Workshop stencils.
You can see all of them HERE.

As you can see it was created with tons of stencils.
The butterflies are images I have that I print when I need them.
The flowers are also from a stencil (not sure which one I used) but I added to them.


Remember just because you use an image on a stencil doesn't mean you can change it.
They are a stepping stone to your creativity.


I would like to know why you like or dislike this piece.
Please leave me a comment here, Facebook or Instagram.
The links are in the top right hand margin of my blog.

Thanks so much for stopping by!
Please come again.


Wednesday, July 22, 2015

I Love Black and White

Hello! Welcome back.
I'm in the process of going through all my pictures and uploading them for safe keeping.
It's such a long process.
Anyway I found a few creations that I have never shared here on the blog.
I will be sharing them with you during the next few days.

First up is a black and white piece.
I love the little angel.
I have many old/vintage photo that I have accumulated over the years.
I have quite a few of these frames.
I bought them for $1 in Joann's.


I used black, white and silver paint plus crackle paste.


I also used glass beads. Here is a close up.


I'm going to try a series of paintings in black and white.
I'm enjoying this combination.

Thanks so much for stopping by!


Monday, July 20, 2015

Tag Swap G+ Community

In June I joined a tag swap in a G+ Community.
These are the tags I received from +June Walker.
They are amazing.

I love the face and all the colors.
 

Isn't this cute?
I love the little heart that dangles from the top.


Love the red, white and blue on this tag.
I wish I can draw birds.


Here is my card I sent to June.
It didn't start out very pretty.
I didn't think I had any before and after pictures but I found them.

Here is what it looked like to start with.
It was in my box of tags that are full of paint, spray inks, etc.
Quite ugly but wait until you see the next picture.


So I tried to use a weird color combination and some stencils.
Ugly!!! So Ugly.


In the end I completely repainted it and added modeling paste, beads, brads and glitter.
Love this. So pretty. It was a perfect tag for June.


Thank you June!
I love your tags.

Thanks so much for stopping by!


Friday, July 17, 2015

Making Surprise Gifts

Hi Everyone!
I love making gifts. Don't you?
Today I have to show another canvas I made in Chicago.
You can see the other one HERE.

This whole canvas was created with five 6x6 stencils from The Crafter's Workshop.
I love that stencils can give you a great background for any project.
With this canvas I love that they gave me a layered abstract look.

You can see all The Crafter's Workshop Stencils HERE.


These are all the stencils I used for this canvas.


I painted the background with my fingers in shades of pinks and added white.
Using Repeating Pods next to start the background and repeated the pattern twice.
I added Believe Script stencil in black in a few places.
Then I continued with Mini Impressions and added the numbers from Ravenscape in purple.
The bird is from the Fly Away stencil.


I love the way this one came out.
This is a 4x4 stretched canvas.
It's the perfect size for a gift.
I may be making more of them!
 
Thanks so much for stopping by!


Monday, July 13, 2015

Blowing Wishes to You

Hi Everyone!
One of my favorite stencils from The Crafter's Workshop is the Number stencil.
I love numbers in my art work so this one is perfect.
 
I did have all the pictures to show you how I created this step by step.
BUT I accidently deleted them including the recycle bin.
I didn't realize I did it until I went back into my folder and they weren't there.
It was one of those moments you say "What was I thinking?". Nothing apparently.
I took about 20 pictures while creating this canvas.
I was so excited I actually remembered to take pictures!!
 
Anyway, I have these pictures and I will try to explain how I created it.
 
I used the paint colors shown in the picture and added the number stencil to my canvas.
You can see I added lots of layers.

 
I decided I wanted a dark canvas so I used Liquitex Spray Paint through the stencil and then sprayed it with water.
I do this so the paint can spread out on the canvas.
I don't use a lot. Just enough to spread and keep the stencil image.
Waited for it to dry and repeated it will another color (4 layers).
The last layer when I pulled up the stencil paint stuck to it (white blotches).
I left it that way and went with is.

 
I used modeling paste through the dandelion stencil (not a TCW stencil, not sure where it came from).
When it dried I used white Pan Pastel on top.
I wanted to add some sparkle so I sprayed it with water and added a little gel medium and while it was wet added glitter.
When it was dry I added a little more Pan Pastel.

 
Side view

 
Other side

 
Close up.

 
Finished!
It's sealed with Krylon Crystal Clear Acrylic.
I bought this in the craft store.
 

Thanks so much for stopping by!